As of yesterday, Stampin' Up has added over 300 new items to their clearance rack. What's even better? For the very first time there are STAMPS included at up to 40% off original prices. You're not going to want to miss this one! You'll find a bunch of old favorites we thought were retired and gone forever available again, but only while supplies last. To take advantage of this head on over to my stampin' store now by clicking HERE, you'll thank me for it later. ;) I went on late last night & stocked up on all sorts of goodies. I want to make sure you have the same chance to get yourself an early Christmas gift at a fraction of the normal cost. Happy shopping!
15 December 2012
10 December 2012
Mojo Monday 271/ New Years

01 December 2012
Fancy Friends Kit

27 October 2012
Ribbon Framelits Case

22 August 2012
Manly Mojo/ Mojo Monday #255

13 August 2012
Floral District Mojo/ Mojo Monday #254

12 August 2012
Scallop Circle Flower Throwdown/ Color Throwdown #204

09 August 2012
Fall Jar Project


08 August 2012
It's Bigger on the Inside?

03 August 2012
Good, Better, Best/ Color Throwdown #203


I let my card for the Color Throwdown this week sort of evolve from good, to better, & finally to best by adding a bit of bling each time. I modified the colors just a bit this week and went with Daffodil Delight, Gumball Green, Tangerine Tango, Crumb Cake, & Marina Mist. Boy do they ever look like summer to me! I've found a couple of new stampin' obsessions lately. One is the Lacy Brocade folder from pg 6 of the new Holiday catalog. It's my new very favorite as you can see from this card. I'm also super into the Vintage Faceted Buttons. They add fun subtle bling that just makes the card pop. We'll do the "better" version of this card in class at the end of the month, but you can always upgrade your card to "best" by ordering some of these great buttons. I'm already almost through my first box!
01 August 2012
Jerry's Core'dinations Birthday

31 July 2012
Raining Flowers Embossed Windows

30 July 2012
Love & Care Batik

29 July 2012
Color Throwdown #202

28 July 2012
Natural Composition Mojo/ Mojo Monday #251

23 July 2012

08 June 2012
Betsy's Blossoms Flower Mojo

07 June 2012
Betsy's Blossoms Father's Day Mojo

06 June 2012
Betsy's Blossom Mojo/ Mojo Monday 244

12 May 2012
Color Throwdown #191

18 April 2012
Welcome Baby Mojo Style/ Mojo Monday 237

It's that time of year again... Stampin' Up has announced its Retired List. Each year, we find out what stamps won't make it into the next catalog. This year, the list is especially long because they are starting a new catalog system in June. So, there are many old friends to say goodbye to. I always remind myself that there will be lots of great new stuff to check out in the new catalog as I march out all my soon to be retired sets for a last hurrah.
Fox & Friends is one of the sets that will no longer be available after May 31st. It's such a cute little group of critters. I love using it for baby and kid cards. For today's example, I used the Mojo Monday sketch of the week. I was glad to find that it worked well with another goal I had--- to use my new Simply Scored Diagonal Plate. That's how I created all those great background scores. I'll be demonstrating how to get this effect & how to make your own envelopes with this tool at my Lakewood Stampin' Social next week & my Second Monday open studio in May. You're going to love how easy this tool is to use! Isn't it fun how the background scores match up so well with the baker's twine? I love it when things work out well!
15 April 2012
Springtime Lilacs/ Color throwdown #187
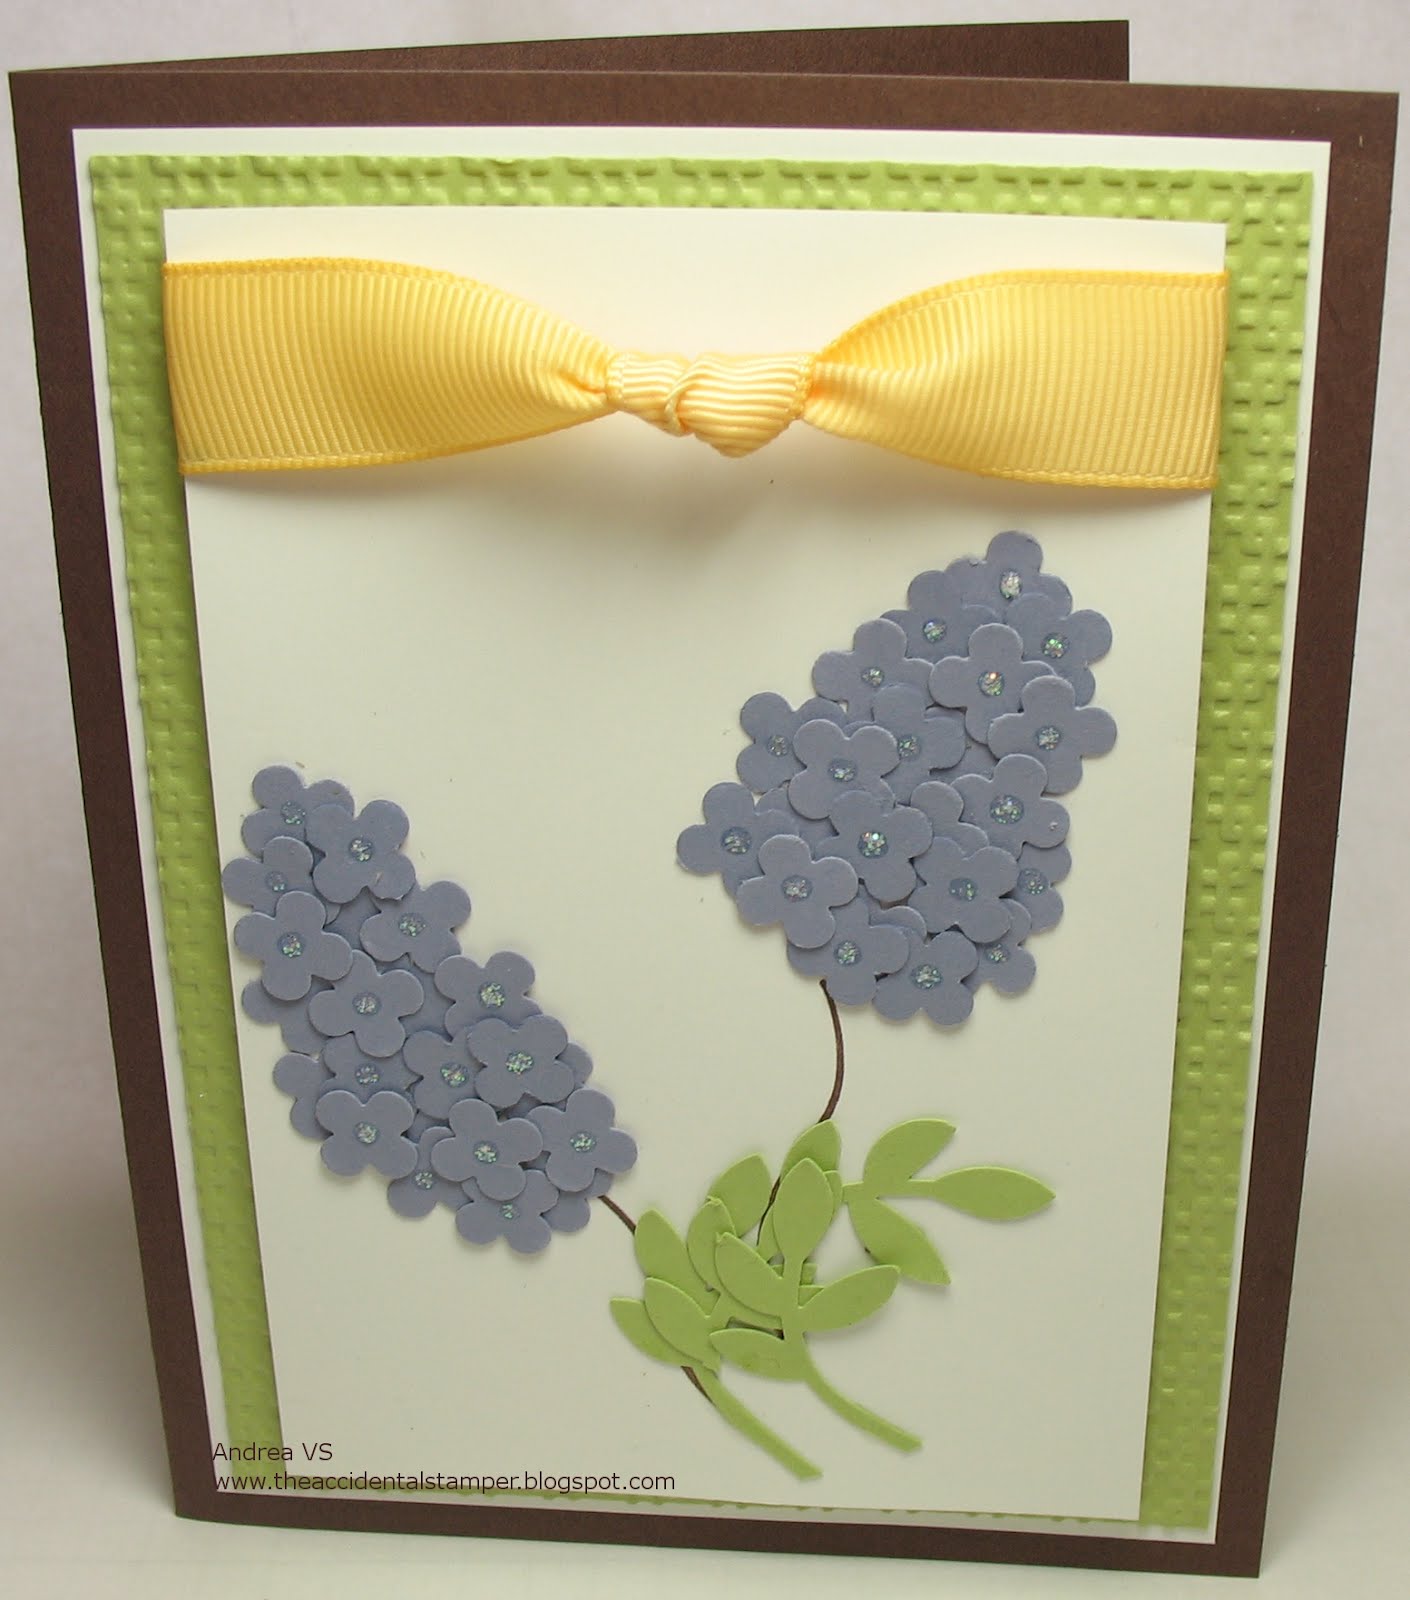
Can you tell what I was cutting out in my garden yesterday? My lilac bushes are in full bloom and there was a chance of snow last night so I wanted to rescue as many blooms as possible while I still could. They inspired me to create paper versions that will last even longer. When I saw how well this plan matched with the color choices from the folks over at the Color Throwdown, I knew this was a great chance to get back into stamping and back into blogging too. The colors for this week's challenge were So Saffron, Chocolate Chip, Certainly Celery, and Lavender Lace. I replaced the Lavender Lace with Wisteria Wonder to make my little lilac sprigs. Please don't ask how many little flowers are in each cluster... I didn't let myself count! All I know, is that I punched a BUNCH of them with my little Punch Pack flower and then punched quite a few more just to make sure. I used all but four! Once I got the clusters together for a trial run, I knew I needed to do something with their centers. A tiny circle of So Saffron was too much. So, I glued them all in place and decided to solve that problem at the end. As I glued them, I liked how the little dot of glue started to give them each a center. Then it hit me, Dazzling Details would be just the ticket! So, I added a little dot to each of the exposed centers. Trust me, there are a lot more that ended up covered up. I may have gone just a bit overboard with layers. That's the fun part though, right? Now I have just a bit a spring to last for months & months.
14 February 2012
Happy Birthday Wishes/ Pentagon Treat Box

Yes, I do know that it's Valentine's Day, but it's also my friend's birthday. So, while it may seem crazy to not post a Valentine today, I wanted to share this great little box with you instead. I made it as a wrapper for a tiny birthday gift. Isn't it fun? As a Stampin' Up demonstrator one of my many perks is a monthly magazine. SU has just done an overhaul of this magazine and filled it up with all sorts of ideas I can't wait to try. This little box was one of them. With just a 5 x 5 1/2" piece of cardstock & my Simply Scored it was a cinch to make. The ends are closed using two Simple Flower punches. Ever so simple and yet very functional. It would make a great container for little Valentine treats as well! Too bad I didn't learn how to make them until it was too late for this year. Oh well, there's always next time!
08 February 2012
Mojo Monday #227

I went a little designer paper crazy with this week's Mojo Monday sketch. It's hard not to with all the lush choices in the Paisley Petals pack. Each design complements the others so well & the color pallet is so versatile. Ever since I saw the images as a preview on the demo website, this designer paper made me think of tapestry or upholstery. It's just lovely. Kindness Matters also grabbed my attention as soon as the catalog came out. It was one of my first orders. Silly me, had I but waited, I could have earned this set for FREE with Sale-a-Bration. At least I can save you the same mistake. These little butterflies can be yours when you place a $50 order during SAB. It's one of the regular catalog items that made its way into the Sale-a-Bration catalog. Just visit my website today and click on "shop now" to get your free set. Don't make the same mistake I did!
05 February 2012
Color Throwdown #177/ Always Elegant Valentine

It's time to bring a little love to this Super Bowl Sunday. Here's my try at this week's color scheme from the folks over at The Color Throwdown. Our very Valentine choices were Basic Black, Melon Mambo, and Whisper White. I'm a huge fan of all that co-ordinates in the stamping world (guess that's why I'm a Stampin' Up demo, huh?) and so I love how the lines from the Always Elegant stamp set go so well with those created by the Elegant Lines embossing folder. It causes an over all effect that just flows together. I feel like my card has its fancy pants on... perhaps a tuxedo? The organza ribbon along with the pearls add that dressed up feel as does the slight shine from embossing my black stamped images. Some times it doesn't take much to dress things up just a tad. It also goes to show that you don't need a whole bunch of stamps to make a really great card. Since all the stamps in a Stampin' Up set are designed to work together, you often just need one set to make a full project. It's just another way that co-ordinating products make my life easier. Now, if only the same applied to my closet... then my mornings would be easier too!
01 February 2012
A Recycling Challenge

A few weeks ago, one of my stampers gave me a bit of a recycling challenge. She has a whole bunch of little bitty tins and wanted to know if I could do something crafty with them. I think my mind has been chewing on this challenge ever since. Today I decided to experiment. I've created a mini magnetic shadow box with the tin and it was super fun. It's a tribute to Sale-a-Bration too! I used some of the Everyday Enchantment paper along with the butterfly brad from the Everyday Enchantment Ribbon & Brad Pack. The Everyday Enchantment line is available only though SAB and I'm very taken with it. Before the promotion ends in March I know I'm going to get my hands on more of both! When something this lovely comes as my free bonus, I know I'm dealing with the right company. :) If you want to make sure you get your Everyday Enchantment paper or accessories contact me today to place an order, or pop on over to my website and click on "shop now".
30 January 2012
Mojo Monday 226

It's been simply forever since I did a card challenge and I really wanted to get back into the groove of things today. So, I checked out what the folks over at Mojo Monday had to offer. Of course, I found a sketch that was just perfect to get my creative juices flowing. It's a "round or square" week over at MM and I went for the square option.
What a perfect way to show off some of my new Sale-a-Bration products! The square stamped image and the designer paper are items I got FREE thanks to SAB and you can too! Just place an order of $50 to qualify for a free item from the Sale-a-bration catalog. The more you spend, the more you earn for free. Each $50 in products earns you another free set, pack of paper, or other great SU item from the new Sale-a-Bration catalog. I love the Everyday Enchantment Designer Paper featured in this card (and not just because it was free). You'll be seeing way more of that soon. Contact me today to place your order or just head on over to my SU website & click on "shop now". Start collecting your FREE stuff today!!
22 January 2012
Tospy Turvy Valentine

Finally, here's the last card for our Valentines Theme class. Isn't it just too cute? When the Turtle and Co stamp set first came out, I saw a get well soon card with this little guy upside down & thought it was such a great idea. The sentiment from the Sale-a-Bration set Sprinkled Expressions was a perfect fit for a topsy turvy turtle friend! Remember that starting on the 24th (just two days!) you can get a free item from the Sale-a-Bration Catalog for every $50 you spend. The fun lasts through the end of March. There are so many great products in the SAB catalog that you'll want to stock up on all your stamping needs now. I love getting free stuff when I order my ordinary stamping needs like Whisper White, envelopes, & Stampin' Dimensionals. I'll need them all anyway, so why not buy in bulk when I can get fun toys for free? If you're one of my Colorado stampers, you can join in my Stamp Club as well. That way, your stampin' dollars can go even further! More details soon...
18 January 2012
Gnome Valentine

I told you things would get a little more silly with today's post. Isn't he just darling though? I knew I wanted to make a Valentine that combined both the Gnome Sweet Gnome & Gnomenclature sets (how could I possibly own one with out the other?) but I didn't really want to color my little friend in with markers. I thought about water colors, but we just did that on another card.... Then it came to me, how about a sepia tone Valentine? Add in just a little splash of color with a bit of Cherry Cobbler and my gnome doesn't require any coloring at all. The new Adorning Accents heart mini-folder created and fast & fun boarder and worked great on my Cherry Cobbler accent piece. Then, out came my new Cherry Cobbler Dazzling Details to add just a little bling. I added a little sponging to all my Very Vanilla pieces and was ready to go! He's clearly just looking for someone to love. And isn't the frog just the cutest?? More fun with Valentines in store for tomorrow...
17 January 2012
Doily Valentine Easel

I'm ever so excited about our Valentine Theme class this weekend. I think I'll even sneak in a couple of the cards to Thursday's class in Lakewood. I would hate for folks to miss out on these beauties! Today's example would do quite nicely as an anniversary card as well as a Valentine. The "white on white" embossing of the card front adds just the right amount of texture to complement the doily pattern from the Flirtatious Designer Series Paper. I love how the Wisteria Wonder cardstock makes the Pretty in Pink from the designer paper just pop! Easel cards are such fun because they're really made to display. That way you can show off the beautiful card while your personal inscription remains hidden. The best part is, now folks can score their own bases for this card in class using my Simply Scored. This new scoring tool makes making non-traditional folds a snap! This card is one of the more "serious" cards from the Valentine line up. Check in tomorrow to see the lighter side of the holiday when I let whimsy take over!
10 January 2012
Sprinkling Happiness

Today's post is my modification on the Mojo Monday sketch from yesterday. I really wanted to play with my new Gnome Sweet Gnome set. It has, as the name implies, super cute little garden gnomes but also great little accent stamps. The flowers, wheelbarrow, & watering can are all from this versatile set. Can you tell I'm having a bit of Spring Fever? Of course, they're predicting snow for tonight...no early flowers for me. The lage flower accent was great fun to make. It is made from the Blossom Builder kit available in the new Occasions Mini Catalog. The kit includes two pages of textured die cut flowers along with two sizes of Blushing Bride Rhinestones. Fast & fun just like the Create & Keep kit. Now I've captured a little spring for this January day.
08 January 2012
Good to Great #5/ Create & Keep Class

Last round for the Good to Great challenge. With the Create & Keep Simply Sent Kit you have everything you need to make ten cards & a box to keep them organized. In these posts, I've shown you how I made the cards & how I added just a few touches to change good to great. That's what I'm offering in my Create & Keep Classes. If you host one, you and all of your friends can make all ten cards & the box for just $25! I'll also toss in a free pack of Stampin' Dimensionals for anyone who places an order at your class. With all the benefits of Sale-a-Bration just around the corner, you and your guest could end up with all sorts of free goodies! Contact me today to learn how!

07 January 2012
Good to Great #4/ Create & Keep Class

There is just so much you can do with the new Create and Keep Simply Sent Kit. In this series of posts, I've given you just a few ideas. Don't worry, I still have a few more up my sleeve for the last post tomorrow! For today's card, I added a few specialized items in my second version. The boarder image on the card front reminded me of the doilies from the Flirtatious Designer Paper so I added one of those. I also thought it would be great fun to add a little paper daisy and pearl to the mix. The end result is simple yet elegant and it's all put together in a flash. The quick assembly of these cards was one of the things that inspired me to offer the Create and Keep classes where you can make all ten cards & their holder in just one sitting! Talk about instant gratification crafting. :) Contact me today to set up your date and make just a little time with friends to craft this new year.

06 January 2012
Good to Great #3/ Create & Keep Class

Round three in my good to great challenge...just two more to go. Remember that for this challenge I am making a pair of cards from the Create & Keep Simply Sent kit. In the first, I use only supplies from the kit, and then, for the second, I spiff things up just a bit. The spiffed up cards along with their storage box are all included in my Create & Keep Classes. You can host one of your very while new Occasions Mini catalog is available--- now to April 30th. Contact me today to reserve a date!
My second card this round required a switch in orientation, but kept the same basic lay out. I just added a little In Color Ruffled Ribbon along with a punch to back my sentiment. Very little changes, but they both make things pop!

05 January 2012
Good to Great #2/ Create & Keep Class

Time for round two! This time I used a bunch of the scalloped boarder self adhesive pieces from the kit all together on my card front. They make a fun effect, don't you think? Of course, I needed to take things a step further in my improved version of the card so I added some Whisper White grosgrain ribbon. I also used dimensionals to pop up my greeting along with a Framelit I cut out using the big shot. They are just small improvements, but they make a big difference. I would love to help you create a full kit of these Create & Keep cards when you host your own Create & Keep class. Contact me today to schedule your own card making adventure!

04 January 2012
Good to Great #1/ Create & Keep Class
 Okay, here's the first round of "good to great" cards made with the supplies from Create & Keep Simply Sent kit. The kit comes with more than enough embellishments to create ten great cards. I just can't leave well enough alone, so I've added bits to each of the cards to make them even better. This is the first example. The pieces to form the card to the left are all from the kit. Nothing else is needed, not even adhesive. They stick all on their own! In the bottom card, I added just a few things. There is an extra strip of Whisper White, one eyelet, a couple of mini brads, & a Whisper White Wide Oval. Oh, and, of course, a couple of Stampin' Dimensionals. As an incentive for folks who attend a Create & Keep class, I'll throw in a pack of dimensionals for each person who makes an order at a Create & Keep Class. That way you'll be all ready to trim out another kit if you decide to order one! Stay tuned for more examples of how to turn these kit cards from good to great without using a single stamp.
03 January 2012
Create & Keep Box


This post is the first in a series. I've made them to introduce you all to one of the most exciting products from the new Occasions Mini Catalog, the Create & Keep box. This Simply Sent kit includes everything you'll need to make ten cards along with the box store them. As you can see, the box even comes with dividers to keep your cards organized. As with everything, I can't quite leave well enough alone, so I added little bits to the cards & the box. The Pearls on the box front are the first example. They're just a little touch that makes a big difference. For each of the five pairs of cards, I'll show you what you can make with the kit alone along with my improved version. It will be a sort of "good to great" presentation. It's also how I would like to introduce a new class that you can host! The Create & Keep class is a way for you & your friends to make the box and all the cards (including my additions) for just $25 each. That's just $2.50 a card not even counting the box or dividers! The cost will cover the purchase of the kit (along with shipping and handling) along with all the embellishments I'll provide to kick the cards up a notch. Contact me today to host your very own Create & Keep class. It will be a great way for crafters and non-crafters alike to stock up on cards for the new year or create a wonderful hand-made present! Keep checking in to see all the cards you can make with this great new product.
01 January 2012
New Year Resolutions

It's a brand new year which means it's time for New Year Resolutions. I got a bit of an early start on mine. I really really really wanted to add more organization to my stamping studio. Do you know the feeling? So, I let the Clearance Rack help me out. There I found Ribbon Keepers. I ordered both the small and large sizes & they have turned my mess of ribbon shelves into a MUCH more organized space. Each order of Ribbon Keepers comes with two keepers that are designed to stack with this great snap system. I didn't have the space to stack them, so I used them separately. They're super easy to put together and make a huge difference. It's the best organization that $4.79 can buy! The keepers shown here are the "small" size. Visit my webstie today to get a start on your New Year's organizational goals!
Subscribe to:
Comments (Atom)